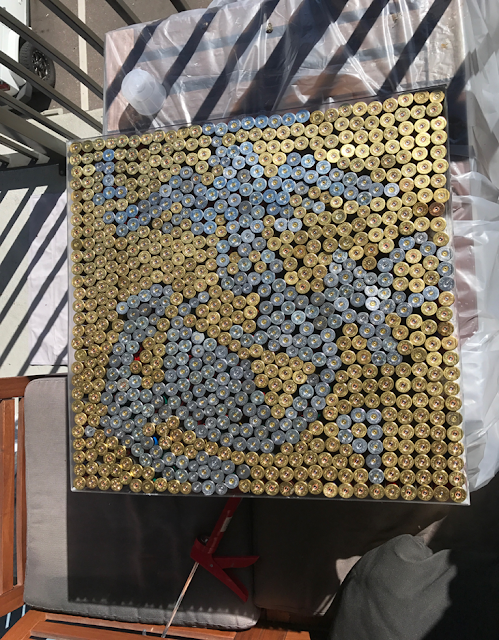
Grid art "The Eagle, Globe and Anchor"
I created my grid art out of the brass ends of shotgun shells; it is the Marine Corps emblem: the Eagle, Globe and Anchor (EGA). The EGA represents a very important time in my life, because it symbolizes my time spent in the military. Since the Marine Corps birthday is around the corner (November 10th), I decided it would also be appropriate to have my project made after its symbol. I decided to use shotgun shells I collected while shooting sporting clays, because that is one of my favorite past time activities, as well as shotgun shells coming in a wide variety of sizes and colors. I was able to take advantage of the various sizes of shotgun shells to help create better resolution of my image. I also wanted to showcase the various colors of the shotgun shells, so I decided to create a border of clear plexiglass. I utilized the silver and gold coating of the brass end of the shotgun shells to actually create my image. Below is a link to the making of my Grid Art video. I am currently in the process of pouring glass epoxy into the frame to not only reinforce the plexiglass and the shells, but to create a flat smooth surface on top, so I have the option of making this into a table afterwards. Sadly glass epoxy is expensive and I will have to add it quart by quart, I predict it will take at least one more gallon of glass epoxy before I reach the desired level.
I first had to find a good image of the EGA to create the outline of the grid, but when I tried to pixelate the image to fit the specifications of the grid and units I would be using, it was not resolved enough so I decided to strictly work with the original. Next problem I had to overcome was printing an image large enough to fit my two foot by two foot base board that was required to fit all of my 900 shotgun shells. To do this I then had to cut my image into pieces that would fit on a single piece of computer paper, then I put the pieces together to form the complete 2 foot by 2 foot image.
I then had the arduous task of counting all the shotgun shells I had gathered to make sure I had at least 900. I then separated the shells by color of their brass end ( Gold or Silver), and also by how large the diameter of the shell was. In total I had somehow gathered exactly 1100 shotgun shells. A majority of the shells were gold rather than silver, so I decided to use the gold ones as the background since there was more.
Next I had to find a base board suitable to my specifications and gather all the supplies required to make my canvas. I then stained and coated my base board's bottom side because I would not be able to once I attached the plexiglass border.
Now came the worst part of this entire project, working with plexiglass. I have done a lot of work with wood and am pretty comfortable with how to work with it, but I have never worked with plexiglass before. It proved a lot more difficult than I thought. First, I had to cut the sheet into four- 24 inch by 3.5 inch sheets. I tried using specialized cutting tools for plexiglass, and when that failed horribly I utilized a jig saw. After going through two large sheets of plexiglass, I was able to get exactly four sheets that fit my specifications. The problem did not end there, while trying to attached the plexiglass to the wood base board, they began to splinter and shatter. I was able to solve this problem with washers that distributed the pressure evenly on the plexiglass to prevent it from shattering.
With the base board and siding finished, I was finally able to begin attaching the shotgun shells to form my image. I used Liquid Nails "Fuze It" because it was able to bond the plastic of the shotgun shells, as well as the wood/paper. Furthermore, this adhesive has a strong hold, but does not dry instantly so I was able to make changes even after I had placed and glued a shell.
Below are some additional angles and views of my grid art


Comments
Post a Comment